Showing posts with label Little Yellow Bicycle. Show all posts

Tuesday, March 19, 2013

More Birds Of A Feather March Kit Goodness!

I have more Birds Of A Feather March Kit projects to share with you that will hopefully put a smile on your face because I am sure smiling about them! If you have yet to get yourself one of these fabulous kits, I suggest you do so soom because Amy's only got five left!

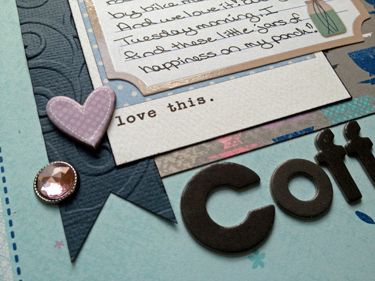
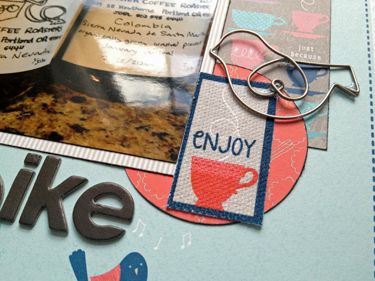
My first layout is one that I thought of right away when I saw the kit. Once I saw the bikes, the coffee cups and mason jars throughout the Little Yellow Bicycle Just Because collection, I knew I needed to do a layout about Courier Coffee. They are a local Portland company that delivers coffee, in mason jars, by bike courier. Yeah, perfect right? So here's my creation. I added a few of the chipboard pieces available as part of the extra embellishments and of course I had to use the cute coffee cup paper that I got as part of the extra patterned paper add-on. Totally love the way this one turned out!

And here are a couple close-ups...

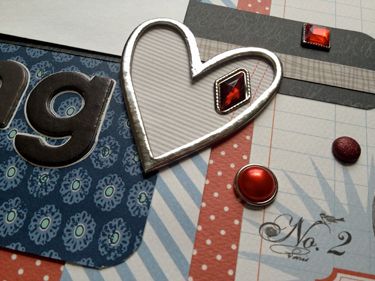
For this next one I started with this gorgeous piece of lined paper from the Teresa Collins Stationary Noted collection and went from there. I wanted to keep the layout clean to allow the background paper to shine. I created the Polaroid frame myself by simply cutting a piece of white cardstock to 4.5"x5.5" and then matting my 4"x4" photo on it leaving a .25" edge along the top and sides and 1.25" edge along the bottom. I kinda went a little crazy with the Petaloo brads but love the way they look!

And here are a couple close-ups...


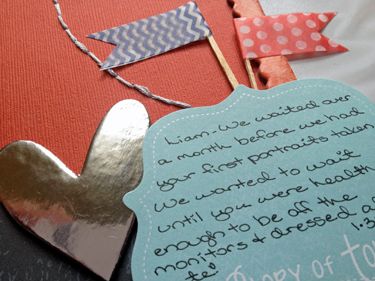
This next layout perplexed me because of the size of the photos. These photos are from Liam's first portrait shoot, and I knew the only one I felt comfortable cropping was the one on the far right. So, I turned to a Sketch Savvy sketch for some guidance. I love the stitched circles; well, I love any hand-stitching on a layout! I made the little flags from pieces of the vellum tape and some toothpicks - super easy, simple and cute! I also broke out the super cute Stationary Noted garland for my border.

And here are a couple close-ups...

And lastly, I threw together a quick card with the leftover scraps from the patchwork card technique I shared a couple weeks ago.
 
Thanks for stopping by today to check out my work! I hope you all have a beautiful Sunday and a very happy St. Patrick's Day!

Wednesday, March 6, 2013

Patchwork card with the Birds of a Feather March kit!

I am so excited to have shared my first Birds of a Feather tutorial! So I decided to share it with all my blog readers here. I saw this technique a few months back at Two Peas and had to give it a try. So here we go!

(1) Gather your supplies: several different papers, a sheet of letter size cardstock, cardstock trimmed and folded to standard greeting card size (5.5" x 4.25"), an adhesive runner, a trimmer and embellishments.

(2) Cut a total of 17 1/2" wide, 12" long strips from your various papers.

(3) Adhere your strips side-by-side vertically along your sheet of letter-size cardstock. Be sure to separate and space out patterns of like color and pattern.

(4) Trim 1/2" strips from your patterned-paper covered cardstock perpendicular to the strips you just adhered to that cardstock.

(5) Adhere the checked strips to your greeting card base. Stagger and flip your strips so that the same patterned block is not adjacent to another block of the same pattern. Once you're finished, you should have a bunch of leftover checked strips so put those aside for use on another project or make a second card! (Note: In these photos, you can see that my squares don't line up perfectly. I purposely cut my strips around 1/2" wide and not exactly 1/2" wide. I did this to give my card a more "homespun" look. Of course, you will have more of an exact, clean grid if you cut all your strips to exactly a 1/2" wide. It all depends on the look you want.)

(6) Trim off the overhanging strip pieces from your card.

(7) Embellish your card and add your sentiment. I prefer to keep the embellishing minimal on this type of card because the background is very busy.

(8) Pick a recipient of your finished card!
 

Thanks for checking out my tutorial! I hope you'll find it useful for creating a quick card that looks like it takes forever to create and it's a great way to use up long, thin scraps of paper!

Thursday, February 28, 2013

"Just Because" the Birds Of A Feather March kit is awesome!

I am so excited to be revealing my first kit projects for Birds Of A Feather! And I couldn't think of a better kit to start with than this beautiful assembly of patterned papers, cardstock and embellishments. Chock full of papers from Little Yellow Bicycle's Just Because collection and Teresa Collins' Stationery Noted collection, along with a set of Thickers and embellishments from Prima, Petaloo, Kaisercraft, Maya Road and more, this kit is not one to pass up. You can snag one here if you haven't already! And, I highly suggest checking out the kit extras too; I ended up getting all of them! One of the best things about this kit is its versatility. You can scrap almost any subject, any season, any person with this kit because of it's combination of cool and warm colors, masculine and feminine patterns and variety of embellishments. But one solid theme does run through the kit and that is "relationships."

So I decided to go with this theme and start off with a layout honoring my mom. Many Christmas' ago, when I was still in college, my mother gave me a beautiful piece of art. It is a clay etching of mother and daughter and it says "Always my daughter, now my friend." With this quote in mind, I created this layout. I loved the Little Yellow Bicycle chipboard Polaroid frame that came in the Extra Embellishments Pack and knew I wanted to use it to focus in on my Mom and I in the photo since there is so much negative space around us. Then, to tie into that chipboard frame, I cut out one of the polaroid prints from the Teresa Collins Polaroids paper (which is part of the Extra Patterned Paper Pack) to use as my title block. I wanted to keep the embellishing feminine and whimsical so I included one of the beautiful Prima flowers and a couple of the elegant Petaloo brads and then added a few of the cute Little Yellow Bicycle chipboard birds and hearts as well as the fabric banner (which is also a part of the Extra Embellishments pack).
(Supplies: Bazzill cardstock; Little Yellow Bicycle and Teresa Collins papers; American Crafts Thicker alphas and lace trim; Little Yellow Bicycle fabric and chipboard embellishments; Prima flower; Petaloo brads; DMC floss; Zig Writer pen, StazOn ink. All items are from the BOAF March kit and kit extras except the floss, pen and ink.)
And here are a couple close-ups...

After I finished my layout, I used up some of my scraps to create this card. I almost always create a card from my scraps after doing a layout. Anyways, I kept the embellishing minimal because there are so many patterns going on in this small space; I knew I didn't need much. I used one of the fabric flags as my sentiment - doing double duty! Love that!
(Supplies: Bazzill cardstock; Little Yellow Bicycle and Teresa Collins papers; Little Yellow Bicycle fabric sentiment flag; American Crafts glitter tape; Petaloo jeweled brad. All items are from the BOAF March kit and kit extras.)

Thanks for taking a look at my projects today! I hope they inspire you to snatch up a March kit and start creating!

Friday, January 25, 2013

More with Little Yellow Bicycle Winterings

So, I showed you on the first of the month two layouts and two cards I created using my Memorable Seasons Design Team Kit featuring Little Yellow Bicycle Winterings. Then, I also issued two challenges so far during the Memorable Seasons sketch-a-thon and used my Winterings kit to create my two sample layouts for these challenges. And I still have one more challenge to come on the 29th with yet another Winterings layout. So, have you kept count? That's five layouts and two cards I made with this kit! But...that's not it. I still managed to squeak out four more layouts using this kit and all were for other design team member's sketch-a-thon challenges. So that's a total of NINE layouts and two cards made with this kit - I am amazed at how far these gorgeous supplies got me! And today, I am sharing those other four layouts I made...
  (Supplies: Little Yellow Bicycle Winterings papers, vellum strips, chipboard and stickers; Bazzill and EK Success cardstock; The Paper Company vellum; Zig Writer; EK Success snowflake punch.)
(Supplies: Little Yellow Bicycle Winterings papers, chipboard, stickers, journaling spot and vellum border strip; Bazzill cardstock; unknown white brad; Studio Calico wood veneers; Zig Writer pen.)
(Supplies: Little Yellow Bicycle Winterings papers, journaling spot, chipboard and stickers; Bazzill cardstock; Hero Arts snowflake brads; unknown white brad; DMC embroidery floss; Westrim Crafts stamps; Zig Writer pen; Joann’s embossing powder.)
 (Supplies: Little Yellow Bicycle Winterings papers, chipboard, stickers, journaling spot and vellum accents; Bazzill cardstock; DMC floss; StazOn ink; Zig Writer pen.)

Monday, December 31, 2012

My first Memorable Seasons reveal: LYB Winterings!

I had a blast working with Little Yellow Bicycle's Winterings collection. I love that the papers are full of browns, tans, creams and grays in addition to the typical blues and white you find in a winter line. It's also awesome that the winter-themed papers have neutral patterns on the B-sides. The stickers have all sorts of fun detail on them - embossing, metallic flocking and tiny buttons! The chipboard embellishments are so much fun too. And the vellum strips and sentiments? LOVE them!

Here's the link to the entire collection in the Memorable Seasons store!

Here is the kit I received (first photo) as well as the backsides of the paper (shown in the second photo)...
And here's the list of exactly what's in my kit and links to it all in the Memorable Seasons store...
And of course I had to order some extras (first photo) and the backsides of those papers (second photo)...
And here's the list of extras I got with links to it all in the store...
And here are my creations working with this amazing collection! In honor of this month's sketchathon, the four projects below are all based on sketches by Becky Fleck of Page Maps. But don't you worry! These aren't my sketch-a-thon challenge sketches - I would never reveal those early. Consider these a sort of bonus that you can put away in your sketch collection for a rainy day!

 (Supplies: Little Yellow Bicycle Winterings papers, chipboard, vellum sentiments and journaling spot; Bazzill cardstock; Jillibean Soup tiny numbers; unknown ribbon; DMC floss; Sakura pen.)

 (Supplies: Little Yellow Bicycle Winterings papers, chipboard, sentiment stickers; accent stickers and vellum strip; Bazzill cardstock; Jillibean Soup tiny alphas; Studio Calico Mr. Huey's mist; StazOn and Close To My Heart ink; Ranger Inkseentials enamel accents; Creative Cafe journaling spot stamp; Sakura pen.)


  (Supplies: Little Yellow Bicycle Winterings papers, stickers and vellum strip; Bazzill cardstock.)

  (Supplies: Little Yellow Bicycle Winterings papers and sentiment sticker; sliver tinsel twine; Jillibean Soup tiny alphas; Kaiser Craft rhinestones.)

And be sure to visit the Memorable Seasons forum to check out what the rest of the Design Team did with their kits! We are not only showcasing Little Yellow Bicycle's Winterings Collection but Crate Paper On Trend, Basic Grey Lucille and a mix-up of various winter-themed products from the Memorable Seasons store. Oh, and we have our Sketch-a-thon going on all month long!

Friday, August 31, 2012

My August Creative Scrappers Sketches

I love Creative Scrappers as much as the next scrapper and their sketches are one of my go-to jumping off points for inspiration. I am so sad I didn't get to all five August sketches before the deadline, but I did manage to complete two and love both resulting layouts. (The other three sketches are "pinned" so I can reference them later!)

So, here's sketch #219...
...And here is my take on it. I adapted the sketch to fit three photos. I also used up a ton of scraps and old stickers on this layout. And, I also used a new product - Washi tape! This is the first (gasp!) time I've used Washi Tape.
Supplies: Bazzill and EK Success cardstock; Little Yellow Bicycle, Basic Grey and Crate Paper  papers; Basic Grey/K and Co epoxy alpha stickers; American Crafts Thicker brackets; Me And My Big Ideas large epoxy circle stickers; Crate Paper epoxy dots; My Minds Eye washi tape; EK Success clear epoxy circles, unknown cardstock sentiment sticker and caption sticker; DMC floss; Creative Memories circle cutters and punches; StazOn ink; Sharpie marker; date stamp; Glue Arts, 3L and Thermoweb adhesives.

Then we have sketch #221...
...And here is my take on it. I used an old, old kit from Treasured Scrapbooking (now closed) for this one. I love this photo of me and my son, Liam, so I really love how this sketch centers the photo smack in the middle of the layout. I edited my photo by upping the contrast and changing it to sepia using PSE. Instead of one large rectangle background, I used strips of paper. I decided to create the circle with hand-stitched embroidery floss.
Supplies: Bazzill cardstock; My Mind's Eye, Prima and October Afternoon  papers; American Crafts alpha Thickers; May Arts trim, Love Elsie chipboard journaling spot; Kaiser Craft pearls; DMC floss; Zig Photo Signature pen; Glue Arts, Helmar and Thermoweb adhesives.