Thursday, June 27, 2013

A couple more 24/7 Layouts!

Hi all! I wanted to share a couple more layouts that I created with my Memorable Seasons June Design Team Kit featuring Simple Stories 24/7 collection. This has to be one of my favorite recent collections and I am so excited I got the chance to work with it. You can pick it up for yourself (if you haven't already) right here in the Memorable Seasons store! So the following layouts were created for the annual Memorable Seasons Throwdown contest. It's not too late if you'd like to join the contest for yourself! We are just at the halfway point and you can jump in at any time. Hope to see you there!


Tuesday, June 25, 2013

Toothpick embellies made with the summery Birds Of A Feather July kit!

It’s been awhile since I’ve had the chance to share a technique with you all, and I am super pumped that I get debut the Birds Of A Feather July kit today along with my technique.  Seriously, this kit is so fun. It just screams summer! If you haven’t seen it yet, be sure to check it out and the coordinating extras too. Yours truly once again had to snatch them all up!

So today, I am actually going to share with you three different cute embellishments you can make using your kit, some extras and a standard kitchen supply – toothpicks! Let’s get started. First thing is to gather all your supplies – papers, a circle punch, a decorative punch, Liquid Glass or Diamond Glaze, washi tape, twine, self-adhesive jewels, beads (from your stash) and, of course, toothpicks.


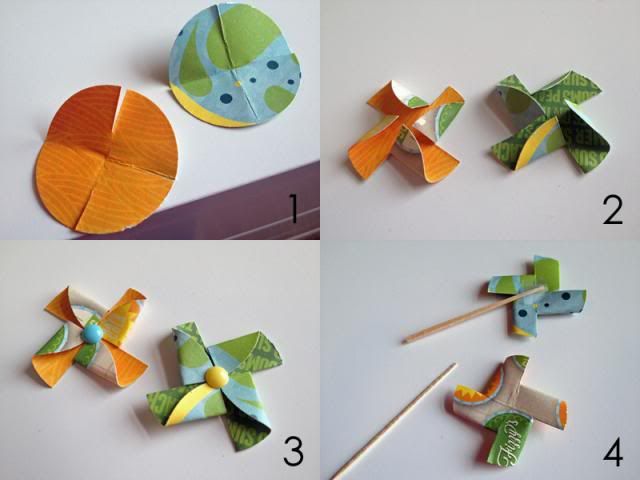
The first toothpick embellishment we are going to create is a pinwheel.
  1. Punch a circle from the paper of your choice, fold it into fourths to create creases, unfold, then carefully cut a slit along each crease about halfway to the center of the circle.
  2. Place a glue dot or similar double-sided adhesive to the center of the circle, then take each alternating corner of the quarter circles and fold in towards the center of the circle. The corners should all meet in the middle and be adhered to the glue dot.
  3. Add a jewel to the center of the pinwheel. (NOTE: At the time I created this tutorial, the lovely Bo Bunny jewels from my kit were MIA so I subbed my leftover enamel dots from the April kit. The buttons in the July kit would also work well if you choose to create larger pinwheels.)
  4. Adhere a toothpick to the back of the pinwheel using a glue dot (or similar adhesive) and a small piece of Scotch tape.

The next toothpick embellishment we are going to make is a lollipop embellishment.
  1. Punch any shape of your choice from your preferred paper.
  2. Cover the shape completely with Liquid Glass, Diamond Glaze or similar product. Allow them to dry for several hours.
  3. Adhere a toothpick to the back of the pinwheel using a glue dot (or similar adhesive) and a small piece of Scotch tape.
  4. If desired, embellish further with a piece of twine. The twine could also be tied in a bow around the toothpick at the base of the shape.

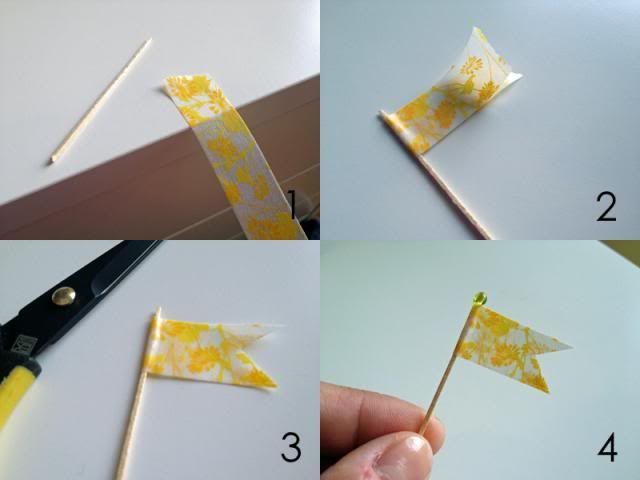
The last toothpick embellishment we are making today is a flag.
  1. Grab a toothpick and tear off about 3” of washi tape.
  2. Wrap the washi tape around the toothpick adhering the two ends together, leaving a small bit of toothpick above the washi. Be careful to keep the edges of the washi tape in line so you don’t end up with a crooked flag.
  3. Cut a pennant shape at the end of the washi.
  4. Add a small dab of glue on the tip of the toothpick above the washi and top off with a bead. Allow it to dry.


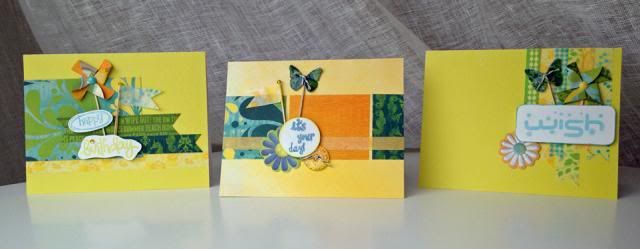
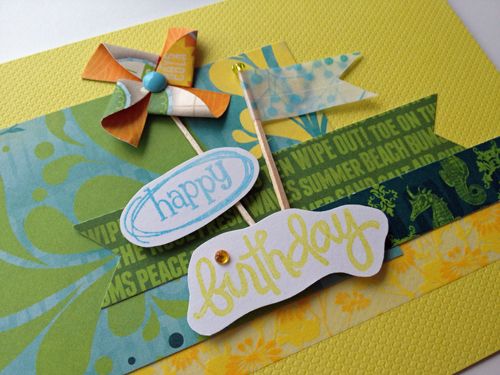
And when you're finished, you have some cute homemade embellishments – all from your scrappy supplies and plain, old toothpicks.

And I used them and my July kit to stock up on my supply of birthday cards!


Hope you enjoyed today's technique! Let me know if you have any questions and I'm excited to see what you all create with your July kits!

Monday, June 24, 2013

Ending the weekend with the end of the Birds Of A Feather June Kit

Hi all! It's a dreary, rainy Sunday night here in the Pacific Northwest. Luckily, I still have bright, cheery Birds Of A Feather June kit here to help brighten up my scraproom! There's still time to grab a kit for yourself if you haven't already and be sure to check out the extras too! So, it's time to share the last of my June projects with you.

My first layout was such a fun one to put together. I used a couple pieces of the Jillibean Soup placemat on some earlier projects but still had most of it intact. So, I decided I wanted to use that large piece as the focus of a layout. I framed four smaller photos with the placemat but then I had a 6x4 photo to contend with that really couldn't be cropped down to fit in one of the squares. So I decided to mat it with cardstock and then back it with chipboard and place it on top of the placemat. I love how the chipboard behind it helps it pop of the page and really become the focal photo. This time around, I altered the corrugated cardboard shapes with embossing powder - now THAT was fun! I also love that I was able to use up a lot of scraps on this one.

And here are a couple closeups...


My next layout I am so in love with. I have had these photos FOREVER and just didn't know where to start with them. I think it was all the different colors in them and the fact that I wanted to keep them all together on a page. Well, since the June kit has just about every color of the rainbow in it, it was perfect to scrap these photos with! I pulled the Lily Bee alpha sticker sheet out of my May Kit to use for the subtitle and when I saw the phrase on my chosen die-cut title card, I just had to pull a few of my coveted Studio Calico wood veneer stars out.

And a couple closeups...


Finally, I have a card to share with you all. I love how American Crafts prints fun patterns on the backside of all the paper strips at the bottom of all their papers. So I decided to use a few of them, along with a "mistake strip" from the above layout to create this card. I used the Cats Eye ink pad to ink the edges of my sentiment block as well as the edges of my card. I really like the definition it adds. I pulled out a couple buttons from my stash to use as flower centers and also stole a few more Lily Bee alpha stickers from my May Kit. This card is going out in the mail tomorrow - it's my Mom's birthday on Wednesday!


Stay tuned because I'll be back here on Technique Tuesday debuting the beautiful July kit!

Thursday, June 20, 2013

Project Life: Week 19

Time to share week 19 today! I really love how this week came together. I think it has a good mix of photos, quotes, journaling and supplies. 

And here is the whole spread with this week's insert - my Mother's Day card from Liam is on one side and the from Andrew is on the other...

And here's a better look at the left side. I love the photo in the upper left. It's of my hubby and our next-door neighbor having a couple beers on our back patio. Hubs had just strung the lights and I love all the helicopters on the ground. I was stealthy trying to take this. I opened up our bedroom window and stuck my are out the window with my iPhone and just took some blind shots. 

And the right side. The "ideal mother" quote was a freebie from Smitha Katti. I felt it was appropriate for both Mother's Day and the collection of photos of Liam from the week - you know, eating a pinecone, climbing in the dog crate, playing in the middle of the kitchen floor, etc. Also, I'm sticking with the ritual of adding a subway art section for each holiday. The QR code on the photo of Liam and Scout leads to a video of the event.

Wednesday, June 19, 2013

Project Life: Week 18

Time to share week 18 now! This week I decided to use one consistent product in addition to my Turquoise Edition Core Kit and that was Simple Stories 24/7 collection. I was sent this collection to work with for my Memorable Seasons June Design Team kit and when I opened it, I saw all the 3x4 and 4x6 journaling cards, the days of the week and everyday stickers, and knew I wanted to use some of it on at least one Project Life spread. And I love that the colors of the 24/7 collection coordinate really well with the Turquoise edition.
And here's the left side. I used a combination of digital elements, a few little embellies from my stash and the 24/7 collection. I actually have none of my Core Kit on this side of the spread. The lower left rectangle is my favorite - I just fussy cut the bottom of the banner so it could overlap my photo.
And here's the right side. I used a couple Core Kit cards on this side, but all the rest are digital freebies, a couple printables and the 24/7 collection. I love the lower right rectangle - again, a 24/7 journaling card with photo, journaling and embellies added.

Tuesday, June 18, 2013

Project Life: Week 17

Catching up slowly but surely. Here's my Week 17 for you. I kept this week pretty basic. Partially because I am playing catchup and partially because it's a very photo-heavy layout and I didn't want to clutter it up too much.
And here's a closer peek at the left side...The photo of Liam in the pack looks like it was run through some sort of filter, but in reality, my printer was running out of black ink. I liked the look of the print, so I decided not to reprint it and just use this one. The "Life is to be enjoyed..." card was a freebie off Becky Higgins web site that I just recolored to match the Turquoise Edition.
And the right side...This one is pretty equal in regards to digital and traditional supplies. Also, the photo in the upper right is mine, not a postcard. I just took the zoo logo from the web site and added it and the date to the photo in PSE before printing. Sadly, this was the last photo I snapped with my Zoom lens before it fell on the concrete and broke. :(

Monday, June 17, 2013

Project Life: Week 16

Week 17 was a week of highs and lows. Personally, we had a very god week but it was a very depressing week as far as current events went, most notably the Boston Marathon bombing. I am a firm believer that Project Life is about documenting "life" - the good, the bad and the ugly. So, I wanted to make sure I included some sort of tribute to that day. 
 And here's a closer look at the left side...I love how the ghost U looks overlapped with the green "love" on the photo of Andrew and I. And the photo of Liam in his crib - a new favorite for sure!
And a better look at the right side...To pay tribute to the marathon bombings, I chose what has become one of the iconic images of the day and simply added Boston/4.15.13 to the corner using PSE. Then, the tricky part came in what to put next to that serious image. I didn't want adjacent to the 4x6 rectangle holding my friend's wedding invitation - that didn't seem right. So I elected to place it next to the photo of Liam in the yard with the passing storm looming in the background. It seemed like a good transition photo. Then I placed a very clean and simple weekly title card below it and across the page gutter I placed the weekly recap.
As always, thank you so much for looking! I'll be back tomorrow with Week #17!

Friday, June 14, 2013

Project Life: Week 15

Okay, I am still behind in Project Life. But, I am really not that far behind. I have through Week 20 scrapped. And Weeks 21 and 22 have the photos narrowed down and the weekly recaps written. I will be doing the same for week 23 tonight. So I am not doing too bad. But, then I realized I haven't shared a Project Life layout here since week 14...whoops. Forgive me and let's remedy that now.

So here's a look at my Week 15 spread...

And a closer look at the left side. I finally figure out this week that I can partially fussy-cut elements on the Core Kit journaling cards and tuck my photos behind them. Ummm...duh. So, I did that twice this week.

And here's a better look at the right side. I am in love with this wide angle shot that the Timbers photographer got at the San Jose game, so I had to swipe it off of FaceBook. The wood veneer umbrella and rain drop rhinestones came from my May Birds Of A Feather Kit. The photo collage in the lower right in honor of our special dinner features only one photo that I took - the wine. All the rest came from the restaurant's web site because I didn't like any of the others I took. I obviously have no problem swiping photos from elsewhere to document our week if I don't have what I need in my stack of photos.
 Thanks for looking and I promise I WILL be back tomorrow to share Week 16. TGIF!!

More with the Bold and Beautiful Birds Of A Feather June Kit!

Hello all! It's time for another Birds Of A Feather June Kit Reveal. If you haven't gotten a kit yet, go grab one now before they are gone and also be sure to check out the kit extras - they are all so much fun and you will see lots of the extras on my reveal projects since I got, um, all of them!

So here is my favorite (so far) layout created with this kit. I really took liberty with the bold patterns and colors on this one. I figured it was only appropriate to match the bright colors and fun patterns of my photos taken at Islands of Adventure's Seuss Landing in Orlando. I inked the edges of my photos in black StazOn to help them pop a bit off all the bright papers. I knew right away that I wanted to use this particular vellum quote from the Maude Ashbury collection as soon as I saw it because I felt it was most appropriate considering the subject matter of my photos. I adhered it to white cardstock, trimmed it down a bit and inked the edges. Then I used foam adhesive to mount it with all the other elements in the lower left corner. Speaking of which, I also love how the Canvas Corp burlap looks in the Jillibean polaroid frame. And I really had fun with the Maude Ashbury 3D flowers too!
And here are a couple closeups...

My next project is another Project 12 catchup layout. And I figured it would be appropriate to scrap last June's Project 12 page with this June's Kit! I really wanted to use the two sheets of bright pink cardstock, available as part of the extra cardstock add-on, for my background but knew that two sheets of it right next to each other, with a lot of the pink exposed, would be too bright. So I muted it a bit by use the Maude Ashbury Memories paper on the right side. I also pulled some yellow vellum from my stash to use as photo mats to help the photos stand out. I lightly brushed the corrugated shapes with paint and then added the very appropriate "Hello Sunshine" flair to my sun. :)
And here are a couple closeups...

Thanks, as always, for looking! I'll be back later in the month with one more reveal with this awesome kit!

Sunday, June 9, 2013

Memorable Seasons June/July Member of the Month - Sally Cranney

I am thrilled to say that Sally Cranney is the June/July Member of the Month at Memorable Seasons! In honor of her being Member of the Month, we asked her to share a little more about herself and some of her favorite layouts. You can check it all out HERE on the Memorable Seasons blog. And, as usual, we are issuing a monthly challenge to scraplift on of Sally's beautiful layouts from her Memorable Seasons gallery. All you have to do to participate is chose any layout from Sally's gallery, scraplift it, then upload it to the gallery and link it back to the challenge thread by July 31st!

I chose to lift this gorgeous layout of Sally's, which I also happened to pick as Layout Of The Week awhile back...

And here's my take on it using my Simple Stories 24/7 June kit...

Congratulations Sally on being the June/July Member of the Month!

Monday, June 3, 2013

June Sketch Challenge at Memorable Seasons!

Hello all! It's my turn this month to issue the sketch challenge over at Memorable Seasons. I decided in honor of our own Sally Cranney making it onto the Sketchabilities Design Team, that I would chose one of Karan's awesome sketches to feature this month! 

Here's the sketch I picked...

And here is my take on the sketch where I used my Simple Stories 24/7 DT kit. Notice how I adapted the sketch to fit my photos... 

I can't wait to see what you all come up with using this sketch!

Remember to...
* Create a new layout or 2 cards for this challenge.
* Please upload your creation into the gallery and leave a link in the challenge thread on the forum by July 31st.

The Birds Of A Feather June Kit Makes My Heart Sing!

Hello all! I hope everyone had a good weekend! 

It's time to share my first reveal using the beautiful Birds Of A Feather June Kit. If you haven't picked yours up in the store yet, do it now because there are only three left in stock! You might want to check out all the beautiful kit extras too; once again, I snagged them all. So now it's time to show you my first creations with this kit. I have to tell you, at first I was a little intimidated by all the bright colors and bold patterns, but once I dove into the kit I had more fun creating than I have in awhile and I can't wait to dig right back into this kit once my out-of-town guests all depart! Oh, and I have to say the Maude Ashbury/Anna Griffin and American Crafts/Dear Lizzy coordinate perfectly together!

For my first layout, I had lots of fun playing with the different patterns in this kit. I fussy-cut out part of some of the chevrons from the Dear Lizzy paper to make them pop and accented them with lines of embroidery floss down the middle. I also added a line of pink floss to the striped paper for added texture and decided to color the corrugated Jillibean embellies with mists. 

And here are a couple closeups...

On my second layout, I went all out with layering and embellie clusters! I knew right away I wanted to use the grid, wood-framed Maude Ashbury paper as the background on a layout. I fussy cut a bit around the arrows in the corners so I could tuck a couple punched circles behind them. And I had a ton of fun adding all sorts of embellies to them to create my clusters. Look at how well the negative pieces from the heart die-cut card work with the heart-patterned Dear Lizzy paper. Also, I used the Cat's Eye espresso ink on my cardboard butterfly and on the edges of my punched circles for added definition.

And here are a couple closeups...

I hope you liked my layouts. I am so excited to show you more later on in the month!

Saturday, June 1, 2013

My June Memorable Seasons DT Kit: Simple Stories 24/7

Last month, I worked with Simple Stories for the very first time (blasphemous I know) and completely fell in love with this manufacturer. So when I had the opportunity to work with them again, I jumped at the chance! And, the 24/7 collection is right up my alley! I love the clean, graphic lines and designs, the primary colors and the extremely versatile images and sentiments that make it perfect for scrapping any topic. You have to check this collection out; here is where you find it in the Memorable Seasons store!

Here's the papers from my kit...
And the backsides...
 And the embellishments and cardstock...
 Then, of course I had to get the rest of the collection...

And here are my creations so far. Stay tuned for more!

This layout features some older photos of my cousins, siblings and I that we took to create a Christmas gift for my grandmother...

And I also decided to use a bunch of the 24/7 on one of my Project Life spreads. I felt the colors in it coordinated perfectly with my Turquoise Edition Core Kit and those fabulous pre-designed 3x4 and 4x6 cards and cute "everyday" stickers are made to use for Project Life...

Finally, I created a quick, fun card...